MondoKeep V2
Community Forums/Showcase/MondoKeep V2
| ||
| OK, I thought it was better to start a new thread here. Taking everything that currently exists for the previous D20 RPG that mutated in MondoKeep I thought I would document my thoughts on the new version. First off is the display. This will be 2d, but 3d. WHAAT I hear you all cry. internally it will be 2d, the display will also be 2d, but it will be in 3d. one set of angles is calculated and these are fed into a texture polygon display. so to begin with I have an x axis (left right), z axis (in out) and y axis (up down). I also have a scale, a y scale (which is the same as looking down or rotating to face sideways). and finally an angle which allows us to see rotation. Note that none of this 3d. it is 2d with some simple maths: global coreAngle:int = 0 global coreAngle2:int = 0 global coreScale:int = 30 global coreYScale:float = 0.5 global coreX1:float global coreY1:float global coreX2:float global coreY2:float method modifyScale(modify:float) coreYScale :+ modify if coreYScale < 0 then coreYScale = 0 else if coreYScale > 1 then coreYScale = 1 end if coreX1 = cos(coreAngle)*coreScale coreY1 = sin(coreAngle)*coreScale * coreYScale coreX2 = cos(coreAngle2)*coreScale coreY2 = sin(coreAngle2)*coreScale * coreYScale end method method modifyAngle(modify:int) coreAngle :+ modify coreAngle2 = coreAngle+90 coreX1 = cos(coreAngle)*coreScale coreY1 = sin(coreAngle)*coreScale * coreYScale coreX2 = cos(coreAngle2)*coreScale coreY2 = sin(coreAngle2)*coreScale * coreYScale end method a quick draw gives us this: simple isometric  and the same rotated 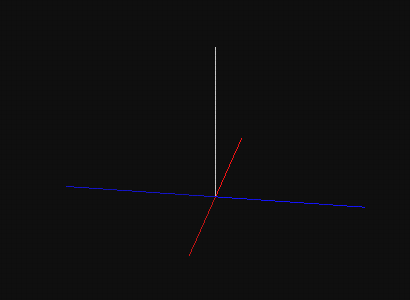 you can think of the centre being 0,0,0 the ends of the red lines (X) being -1,0,0 and 1,0,0 the ends of the blue lines (Y) being 0,-1,0 and 0,1,0 the end of the white line (Z) being 0,0,1 logically for any normalised point (x,y,z) from -1 to 1 is just a simple multiply of these 3 end points - one set of simple calculated angles next up I will look at polygons I should add that this is not true 3d. it will give perfect isometric and also orthographic displays allowing you to do the same style as Fez |
| ||
ok, so lets have polygons: first we will update the core code a bit: global coreAngle:int = 0 global coreAngle2:int = 0 global coreZoom:int = 15 global coreYScale:float = 0.5 global coreX1:float global coreY1:float global coreX2:float global coreY2:float global coreX3:float global coreY3:float method modifyZoom(modify:int) coreZoom :+ modify if coreZoom < 5 then coreZoom = 5 else if coreZoom > 50 then coreZoom = 50 end if fillPrecalc() end method method modifyScale(modify:float) coreYScale :+ modify if coreYScale < 0 then coreYScale = 0 else if coreYScale > 1 then coreYScale = 1 end if fillPrecalc() end method method modifyAngle(modify:int) coreAngle :+ modify coreAngle2 = coreAngle+90 fillPrecalc() end method method fillPrecalc() coreX1 = cos(coreAngle) * coreZoom coreY1 = sin(-coreAngle) * coreZoom * coreYScale coreX3 = cos(coreAngle2) * coreZoom coreY3 = sin(-coreAngle2) * coreZoom * coreYScale coreX2 = coreX1 + coreX3 coreY2 = coreY1 + coreY3 end method what this has done is added a zoom value and added 3 recalculated variable which are the three corners (clockwise rotation from x,y) x, x1,x2,x3. these are our four corners. so for any given x,y these are the correct four corner base offsets. now we will use these corners to draw a filled polygon of our chosen color using opengl: Method DrawPoly(x1:Float,y1:Float, x2:Float,y2:Float, x3:Float,y3:Float, x4:Float,y4:Float, r1:Float, g1:Float, b1:Float, alpha:float) glColor4f(r1, g1, b1, alpha) glBegin(GL_TRIANGLE_STRIP) glVertex2f(x4,y4) glVertex2f(x1,y1) glVertex2f(x3,y3) glVertex2f(x2,y2) glEnd() End Method this takes 4 clockwise rotated positions plus a color (0..1) and draws it here is the code to draw it with the precalculated corners. it is coloured red (1,0,0) with full alpha (1) DrawPoly(x,y, x+coreX1, y+coreY1, x+coreX2, y+coreY2, x+coreX3, y+coreY3, 1,0,0,1) And last we will use a simple loop to draw 8 offset polygons:  local xx:int local col:float = 1 for xx = 1 to 8 DrawPoly(x,y, x+coreX1, y+coreY1, x+coreX2, y+coreY2, x+coreX3, y+coreY3, col,0,0,1) x :+ coreX1 y :+ coreY1 col :- 0.1 next |
| ||
moving slightly on. lets centre everything and draw in the y: here's the code changes: method fillPrecalc() coreX1 = cos(coreAngle) * coreZoom coreY1 = sin(coreAngle) * coreZoom * coreYScale coreX3 = cos(coreAngle2) * coreZoom coreY3 = sin(coreAngle2) * coreZoom * coreYScale coreX2 = coreX1 + coreX3 coreY2 = coreY1 + coreY3 end method and the actual drawing code: local xx:int local yy:int local xStore:float local yStore:float local red:float = 1 local green:float = 0 local blue:float = 0 local alpha:float = 1 local xCount:int = 8 local yCount:int = 8 x :- xCount * coreX1 * 0.5 y :- xCount * coreY1 * 0.5 x :- yCount * coreX3 * 0.5 y :- yCount * coreY3 * 0.5 xStore = x yStore = y for yy = 1 to yCount for xx = 1 to xCount DrawPoly(x,y, x+coreX1, y+coreY1, x+coreX2, y+coreY2, x+coreX3, y+coreY3, red,green,blue,alpha) x :+ coreX1 y :+ coreY1 red :- 0.1 next red = 1 green :+ 0.1 xStore :+ coreX3 yStore :+ coreY3 x = xStore y = yStore next so what is it doing? - first we precalc the initial angle stuff with the scales, zooms, etc. this only need to be done once and any time we actually change anything - next we offset the x by the xcount*0.5 - and then do the same for the y. this will make it centred - we must store the initial position, cause we will use this for the next line offset - its then just 2 simple loops with virtually no maths all relatively simple and efficient. next up i'll look at height. it's nothing difficult, so don't worry |
| ||
| ok Height. lets step back and think. hmmm. when we look side on the height is our scale height. it's the scale height cause thats what we use to find the next position. so a cube is scale x scale x scale hmmm, when we look down the height is actually 0 or nothing cause looking down a vertical axis has no height. so... side=full height, top= no height now we get the side/top view by altering coreYscale if coreYScale = 0.5 we are sorta looking half up/down:  if we decrease coreYScale to 0 we are looking at the side: 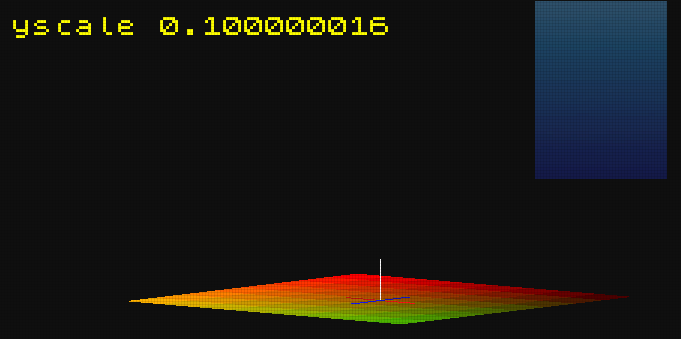 and if we increase to 1 we are looking from the top:  so height is the inverse (1-x) of coreYscale. Yippee nothing complex Heres' the modified code: global coreHeight:float method fillPrecalc() coreX1 = cos(coreAngle) * coreZoom coreY1 = sin(coreAngle) * coreZoom * coreYScale coreX3 = cos(coreAngle2) * coreZoom coreY3 = sin(coreAngle2) * coreZoom * coreYScale coreX2 = coreX1 + coreX3 coreY2 = coreY1 + coreY3 coreHeight = coreZoom * (1-coreYScale) end method you can see the white line in the above pics is the correct height. That is how you get faux3d in 2d with virtually no trouble. Yep, I know it's dirty and it smells a bit and could be cleaned up (for the queen you know), but hey. you didn't pay for it :) |
| ||
| So you use Blitzmax for this ? |
| ||
| yep. there's a lot of code not shown for handling the windows and the game framework. So you just get the actual code for the new 2d3d rendering |
| ||
| Hey AdamStrange, are you using Mini or Open? just curious. :) |
| ||
| Adam, Let's go ahead! It's very interesting :) |
| ||
| it's just openGL next up if fast depth detection. why do we need this? cause particles like depth... |
| ||
| ok... depth First what is it? basically the nearer something is to you the higher it's depth the further away it is the lower its depth so... if everything draw has a depth value. we start at the lowest depth and draw with the highest depth being the last thing we draw. which means? things nearer are drawn later and particles can also be included if they have a depth parameter. so lets look at a slightly modified pic using red as the depth. darker is further away, nearer is closer to us:  so how do we go about this without loads of really nasty math and square root, etc? first here's the changes to the basics: global coreYScaleM:float method modifyScale(modify:float) coreYScale :+ modify if coreYScale < 0.001 then coreYScale = 0.001 else if coreYScale > 0.99999 then coreYScale = 0.99999 end if fillPrecalc() end method method modifyAngle(modify:int) coreAngle :+ modify if coreAngle > 360 then coreAngle :- 360 else if coreAngle < 0 then coreAngle = 360 + coreAngle end if coreAngle2 = (coreAngle+90) if coreAngle2 > 360 then coreAngle2 :- 360 else if coreAngle2 < 0 then coreAngle2 = 360 + coreAngle2 end if fillPrecalc() end method method fillPrecalc() coreX1 = cos(coreAngle) * coreZoom coreY1 = sin(coreAngle) * coreZoom * coreYScale coreX3 = cos(coreAngle2) * coreZoom coreY3 = sin(coreAngle2) * coreZoom * coreYScale coreX2 = coreX1 + coreX3 coreY2 = coreY1 + coreY3 coreYScaleM = 1 - coreYScale coreHeight = coreZoom * coreYScaleM end method we have a new variable coreYScaleM which is the minus version of coreYScale (1-coreYScale) because a value of 1 or 0 would give us nasty depth problem, we limit the scale slightly to a max of 0.99999 and min of 0.001 BlitzMax mod command isn't really that good and can give strange errors, so we have coded our own for the angles and lastly the precalc has the new coreYScaleM now we come to the getting the depth. we are going to run through and get the depth separately: local depth:float = 0 local depthmin:float = 9999 local depthmax:float = -9999 local depthy:float = 0 local depthx:float = 0 for yy = 1 to yCount depthx = 0 for xx = 1 to xCount depthx :+ coreY1 depth = (depthx + depthy) * coreYScaleM if depth < depthmin then depthmin = depth end if if depth > depthmax then depthmax = depth end if next depthy :+ coreY3 next local depthdiv:float = depthmax-depthmin We use the same principles to get the actual draw location and then use that to get a depth value. We also track for a max and min value we can use to normalise the depth values lastly we now draw our polygons with their corrected (red showing how deep) depth: depthy = 0 for yy = 1 to yCount depthx = 0 for xx = 1 to xCount depthx :+ coreY1 red = (((depthx+depthy)*coreYScaleM)-depthmin) / depthdiv DrawPoly(x,y, x+coreX1, y+coreY1, x+coreX2, y+coreY2, x+coreX3, y+coreY3, red,green,blue,alpha) x :+ coreX1 y :+ coreY1 red :- 0.1 next depthy :+ coreY3 ' red = 1 ' green :+ 0.1 xStore :+ coreX3 yStore :+ coreY3 x = xStore y = yStore next you can see the drawing code is just the same but with some small depth variables added. red is normalised (value goes from 0 to 1) by removing the min depth value and then dividing by the depthdiv. that's is why we need to do the depth first to get these variables. the code itself is very simple (as am I) so you shouldn't have too much trouble figuring out what is going on? One last thing. The depth value is NOT accurate! It doesn't need to be, it only needs to know the general depths. Yep. I know this goes against everything you are taught about things being precise, but in this situation it doesn't need to be. it just works! the real fun will begin when we create a list that can be sorted and used for drawing to screen. the theory is simple: For every drawn object find the depth and then depth sort everything and then draw them. |
| ||
| ok, next up to to bring a bit of height and order first lets make our 'map' 16x16. we'll use an array of 18x18 which allows for a 1 cell border to ease checking we'll also put the map in a new type: type TMapCell field Height:float end type As you can see nothing interesting apart from a height. that should be fun. also from here on i'll only real show the main points. cause it will all go Pete Tong or i'll get bored or the world will get eaten by the great Space Goat... we will need to modify the drawing code to allow for height: local nx:float local ny:float depthy = 0 for yy = 1 to yCount depthx = 0 for xx = 1 to xCount depthx :+ coreY1 red = (((depthx+depthy)*coreYScaleM)-depthmin) / depthdiv nx = x ny = y+(newMap[xx,yy].height*coreHeight) DrawPoly(nx,ny, nx+coreX1, ny+coreY1, nx+coreX2, ny+coreY2, nx+coreX3, ny+coreY3, red,green,blue,alpha) x :+ coreX1 y :+ coreY1 red :- 0.1 next and here is the result:  the gradient is the original bitmap from the first MondoKeep stretched to fit Next up some joining and possibly depth sorting (it's rapidly approaching)? |
| ||
here's 1 side joined: ignoring the depth sorting issues, we need to alter the code: type TMapCell field Height:float field x0:float field y0:float field x1:float field y1:float field x2:float field y2:float field x3:float field y3:float method setXY(nx0:float, ny0:int, nx1:float, ny1:int, nx2:float, ny2:int, nx3:float, ny3:int) x0 = nx0 y0 = ny0 x1 = nx1 y1 = ny1 x2 = nx2 y2 = ny2 x3 = nx3 y3 = ny3 end method end type basically we are storing the four corners of each cell at its display position so we now fill in those corners first (in the pre calc depth scanning): local nx:float local ny:float local depth:float = 0 local depthmin:float = 9999 local depthmax:float = -9999 local depthy:float = 0 local depthx:float = 0 for yy = 1 to yCount depthx = 0 for xx = 1 to xCount depthx :+ coreY1 depth = (depthx + depthy) * coreYScaleM if depth < depthmin then depthmin = depth end if if depth > depthmax then depthmax = depth end if nx = x ny = y-(-0.5*coreHeight) if xx-1 = 0 then newMap[0, yy].setXY(nx+coreX3, ny+coreY3, nx, ny, nx+coreX3, ny+coreY3, nx, ny) end if ny = y-(newMap[xx, yy].height*coreHeight) newMap[xx, yy].setXY(nx,ny, nx+coreX1, ny+coreY1, nx+coreX2, ny+coreY2, nx+coreX3, ny+coreY3) x :+ coreX1 y :+ coreY1 next xStore :+ coreX3 yStore :+ coreY3 x = xStore y = yStore depthy :+ coreY3 next local depthdiv:float = depthmax-depthmin and now draw it: depthy = 0 for yy = 1 to yCount depthx = 0 for xx = 1 to xCount depthx :+ coreY1 red = (((depthx+depthy)*coreYScaleM)-depthmin) / depthdiv DrawPoly(newMap[xx, yy].x0,newMap[xx, yy].y0, newMap[xx, yy].x1,newMap[xx, yy].y1,.. newMap[xx, yy].x2,newMap[xx, yy].y2, newMap[xx, yy].x3,newMap[xx, yy].y3, red,green,blue,alpha) if coreAngle > 180 and newMap[xx-1, yy].height < newMap[xx, yy].height then DrawPoly(newMap[xx-1, yy].x1,newMap[xx-1, yy].y1, newMap[xx, yy].x0,newMap[xx, yy].y0,.. newMap[xx, yy].x3,newMap[xx, yy].y3, newMap[xx-1, yy].x2,newMap[xx-1, yy].y2, 0,red,0,alpha) end if ' setcolor 250,250,250 ' _DrawNSprite(101, nx+centerX,ny+centerY, coreZoomN,coreZoomN) red :- 0.1 next depthy :+ coreY3 next you can see the drawing code becomes simpler. but i will explain a couple of points. the angle is checked cause we only draw (the green side) when it is facing us we only draw a (green) side if the previous xx location is lower using this concept we can now draw all the four visible sides. |
| ||
Lastly we are going to move some stuff around, separate the drawing and bring in the entity system and depth sorting: Don't worry too much. most of it is very simple :) First off we are going to need a base entity class: const ENTITY_NONE:int = -1 const ENTITY_BASE:int = 0 type TEntity field position:int field depth:float field kind:int field x:int field y:int method add(nPosition:int, nKind:int, nX:float, nY:float, nDepth:float) position = nPosition kind = nKind x = nX y = nY depth = nDepth end method end type the really important variable is the position. using this we will create a non-list sortable data structure. so we will not being allocating any more memory or messing with pointers or lists, or anything nasty. Next up is to make some of the depth variables global global coreDepthMin:float global coreDepthMax:float global coreDepthDiv:float |
| ||
now we need to initialise our new code'make new map local x:int local y:int for y = 0 to 17 for x = 0 to 17 newMap[x, y] = new TMapCell if x = 0 or x = 17 or y = 0 or y = 17 then newMap[x, y].height = -0.5 else newMap[x, y].height = rand(0,1) end if next next entityCount = -1 for x = 0 to 2047 entity[x] = new TEntity next this needs to be done at least once |
| ||
| for some wiser reason i can't post the modified depth code. so I'll just give you the actual depth sorting and drawing code instead: method DrawMapCell(xx:int, yy:int, red:float, green:float, blue:float, alpha:float) DrawPoly(newMap[xx, yy].x0,newMap[xx, yy].y0, newMap[xx, yy].x1,newMap[xx, yy].y1,.. newMap[xx, yy].x2,newMap[xx, yy].y2, newMap[xx, yy].x3,newMap[xx, yy].y3, red,green,blue,alpha) if coreAngle > 180 and newMap[xx-1, yy].height < newMap[xx, yy].height then DrawPoly(newMap[xx-1, yy].x1,newMap[xx-1, yy].y1, newMap[xx, yy].x0,newMap[xx, yy].y0,.. newMap[xx, yy].x3,newMap[xx, yy].y3, newMap[xx-1, yy].x2,newMap[xx-1, yy].y2, 0,red,0,alpha) end if if coreAngle < 180 and newMap[xx+1, yy].height < newMap[xx, yy].height then DrawPoly(newMap[xx+1, yy].x3,newMap[xx+1, yy].y3, newMap[xx, yy].x2,newMap[xx, yy].y2,.. newMap[xx, yy].x1,newMap[xx, yy].y1, newMap[xx+1, yy].x0,newMap[xx+1, yy].y0, 0,0,red,alpha) end if if coreAngle > 90 and coreAngle < 270 and newMap[xx, yy-1].height < newMap[xx, yy].height then DrawPoly(newMap[xx, yy-1].x2,newMap[xx, yy-1].y2, newMap[xx, yy].x1,newMap[xx, yy].y1,.. newMap[xx, yy].x0,newMap[xx, yy].y0, newMap[xx, yy-1].x3,newMap[xx, yy-1].y3, red,0,red,alpha) end if if (coreAngle < 90 or coreAngle > 270) and newMap[xx, yy+1].height < newMap[xx, yy].height then DrawPoly(newMap[xx, yy+1].x0,newMap[xx, yy+1].y0, newMap[xx, yy].x3,newMap[xx, yy].y3,.. newMap[xx, yy].x2,newMap[xx, yy].y2, newMap[xx, yy+1].x1,newMap[xx, yy+1].y1, red,red,0,alpha) end if end method method DrawEntities() local curr:int local nxt:int local store:int 'do debug bubble sort on the position references (we only swap the position reference, not the data !) for curr = 0 to entityCount-1 for nxt = curr+1 to entityCount if entity[entity[curr].position].depth > entity[entity[nxt].position].depth then store = entity[curr].position entity[curr].position = entity[nxt].position entity[nxt].position = store end if next next local depth:float 'draw sorted for nxt = 0 to entityCount curr = entity[nxt].position depth = (entity[curr].depth-coreDepthMin) / coreDepthDiv DrawMapCell(entity[curr].x, entity[curr].y, depth,0,0, 1) next 'draw unsorted ' for curr = 0 to entityCount ' depth = (entity[curr].depth-coreDepthMin) / coreDepthDiv ' DrawMapCell(entity[curr].x, entity[curr].y, depth,0,0, 1) ' next end method  |
| ||
and here with some heights grown: it is interesting to see that this looks like a city. maybe pick the lowest point and use that as a starting for a river, made some building block systems and you have a city! |
| ||
| First off is the display. This will be 2d, but 3d So 3d with a fixed camera? I first assumed you are creating 48x48-3dblocks, each representing a pixel of handcrafted 2d sprites ... so something like "voxels". Now it seems as if you do a default 3d-thing with a fixed camera. I liked the 2D things more - suits better to small "retroish"-games. Only benefit I see for now: compared to your mage game (which would be the better choice to finish - if you like the graphical 3dish-style) this code might now run with pure OpenGL - so Linux, Mac and Windows. But maybe I am understanding it incorrectly and that's why I ask for a little clarification. Next to "tinkering stage": make yourself a little todo-list, so to see what is missing for a complete game, and then, fulfill tasks each after another. Doing this semi-publically allows for others to chuck in and provide ideas/suggestions which you elsewise would have missed. bye Ron |
| ||
| @Derron, please read the descriptions and follow the code. THIS IS ALL 2D NOT 3D! There is no camera (fixed or floating in the water) |
| ||
and more with some base colouring and some trees: what is the aim? - 16x16 grid - single player - you control one thing not multiple group(like in final fantasy tactics) - get from a to b? - kill all enemies on map? - find x? - quest based? - auto generated map or possible pre-defined? - or both? |
| ||
| So it is fake-3d / fake-perspective, like distorting/squashing a rectangle (to parallelograms etc). Didn't read your code (not have had the time yet, not my main target when it comes to learning). Just a question: Doesnt the "software approach" lead to pixels not being occupied from either of the block's side? As they are distinct shapes the jagged lines of a line might be not overlaying each other (hard to describe) @a game graphics remind a bit to "snake rattle n roll" (NES game - which I would have liked to see remaked). @auto generated / predefined Of course you need to present the "seed" for your random number generator (mersenne twister...) so each level could get "shared" with others without trouble. @ kill enemies then objects need to be "climbable" in some situations (each X in height increases shooting range or so) - but climbing costs turns. @ water Water could climb too (ocean - tide) and then filling some fields (making them no longer traversable/moveable) @hiding What happens if a unit is behind a block, planned some kind of "see through outlines" ? bye Ron |
| ||
| Doesnt the "software approach" lead to pixels not being occupied from either of the block's side? not as far as I have seen. @hiding What happens if a unit is behind a block, planned some kind of "see through outlines" ? the entire map is fully rotatable in 3 dimensions. So there is no 'hiding' everything can be seen by rotating the map, or scaling it, or shifting the y angle so you are looking straight down on the map |
| ||
trees and bushes and slightly modified generation: |
| ||
ok, following on i've now got this: you can see the figure - that's you that is... and the sort of lighter blue/purple blocks are the ones you can access. So in any map there will be parts you just can't get to. The colours are there just for debug so I can see what is going on. |
| ||
removing all the debug colors and fixing a few display bugs. here we are so far: depth sorting has been finished with a shel sort so it's now ultra fast (x3-x4 speed increase) - there are some flies. they flit about but don't move to another square - when you get in water, you drop into it |
| ||
| @ shell's sort Is there a special reason to use thus sorting approach/algorithm? If you use it for tiles and entities...couldn't you use some remove-add approach to avoid complete iterations over all entities to sort them. I mean..it should benefit from a nearly static world..which means less things to sort. Another option is to sort only moveable entities on updates..and static ones on initialization of the map. Bye Ron |
| ||
| the map rotates, so all depths need to be calculated if there are any particles - which there will be, then the depths need to be calculated if the players move - which they will, then depths need to be calculated and so on. quick test basic bubblesort on 200 entities 2-4 millisecs with shelsort constant 0 millisecs |
| ||
| Sorry for derailing it into "sorting"-questions I took this code now: And I am sorting a TList with 1000 entities in ~2.5ms - and it only takes that long, because I am calculating some sin()-values in the comparison method. Removing it, results in ~0.2ms or so. Are you calculating the Z-index during sort, or is it cached somewhere (field z:int) ? I assume the Z-Value is stored and then manipulated via "view" (map rotation etc.). So maybe you could have a "localZ" (for a given default view) and when rotating, you should update a "z"-Value describing the current-world-view-z-index. So when then sorting, everything is already precalculated for static objects and only dynamic ones (particles, playerS) have to recalculate their z-index for the current view on each "manipulation"-call. But also this time: they update their value on change ("onMapRotate" or within a particle.Update() ), not on "update world". This is then similar to an event system: only do things when they happen (do not check for "is my button clicked?" but wait for an external system calling "onClick"). Nonetheless: these kind of (potential) optimization could be done later on. First: finish prototyping so people could really play something (which should then encourage you to continue developing ... or ... or even ... finish the project ;-) ). @ tiles One small suggestion: What do you think of doing "slopes" on the ground tiles? Should then be possible to achieve a look (untextured) similar to this: bye Ron |
| ||
| yep, sloped sides would be possible, but I'm sticking with the block sides currently. Sorta working out landscaping. here's a bridge/road thing:  |
| ||
Phew! That was not a simple task... Taking the poly draw code and extending it to support textures. The problems lay with how I am addressing them, which is a single texture with a sprite atlas system. it needed some had tweaking to reference the offsets correctly. I have NO idea why - but it now works correctly? |
| ||
first steps now. something has attracted the Mondos... but seriously. next step is making them move. i'm thinking of giving them complete AI. not sure exactly how to implement it as yet. but it will go something like this: 1. pick a position for the monster - query (ask me) if that position is good or bad. depending on the choice use that for the next pick and store the choice to a file. 2. read the AI file in at load. given a known valid choice - make it. if it is unknown then ask what to do. repeat |
| ||
| Any progress to report or stalled a bit? bye Ron |
| ||
| Adam is an amazing programmer! My latest creation Adam took me 3 days but as usual isn't programed in nice modern looking code hehe, Ive decided not to share my code in this game though, I'm hoping to use it as a advert to new employers Main game link for Windows, and MacOSX version 15 https://drive.google.com/file/d/0Bwg1l-y33WTRZG52dzBQaDZ6WVU/view?usp=sharing screenshot https://drive.google.com/file/d/0Bwg1l-y33WTRejdVSHpjbnR4b0k/view?usp=sharing |
| ||
| Impressive Voxelly thread, nice work and well described ;) |
| ||
Thanks. I had to use it when redoing the concept code for another project. The voxels use the same code mechanism presented above. |
| ||
| Wow, I somehow missed this whole thread until now! The later landscape shots look sweeeeet. |
| ||
This uses the exactly the same landscape system but with the added ability to render slopes. the only bitmaps are the texture crops and bushes/trees |
   |